how to replace car headlight bulb high low beam is usually a straightforward DIY job, but the details matter because a small mistake can cause flickering, moisture in the housing, or a beam pattern that blinds other drivers.
If your high beams work but low beams don’t, or the other way around, it often points to a specific bulb type, a dual-filament issue, or even a connector or fuse problem. Fixing it the right way improves nighttime visibility and helps you avoid getting pulled over for equipment violations.
Below is a practical, garage-friendly guide that focuses on what tends to trip people up in real life: choosing the correct bulb, getting access behind the headlamp, not contaminating halogen glass, and confirming the aim after you’re done.
High beam vs low beam bulbs: what you’re actually replacing
Some cars use one dual-beam bulb for both high and low beams, others use separate bulbs. That one detail changes the diagnosis and what you buy.
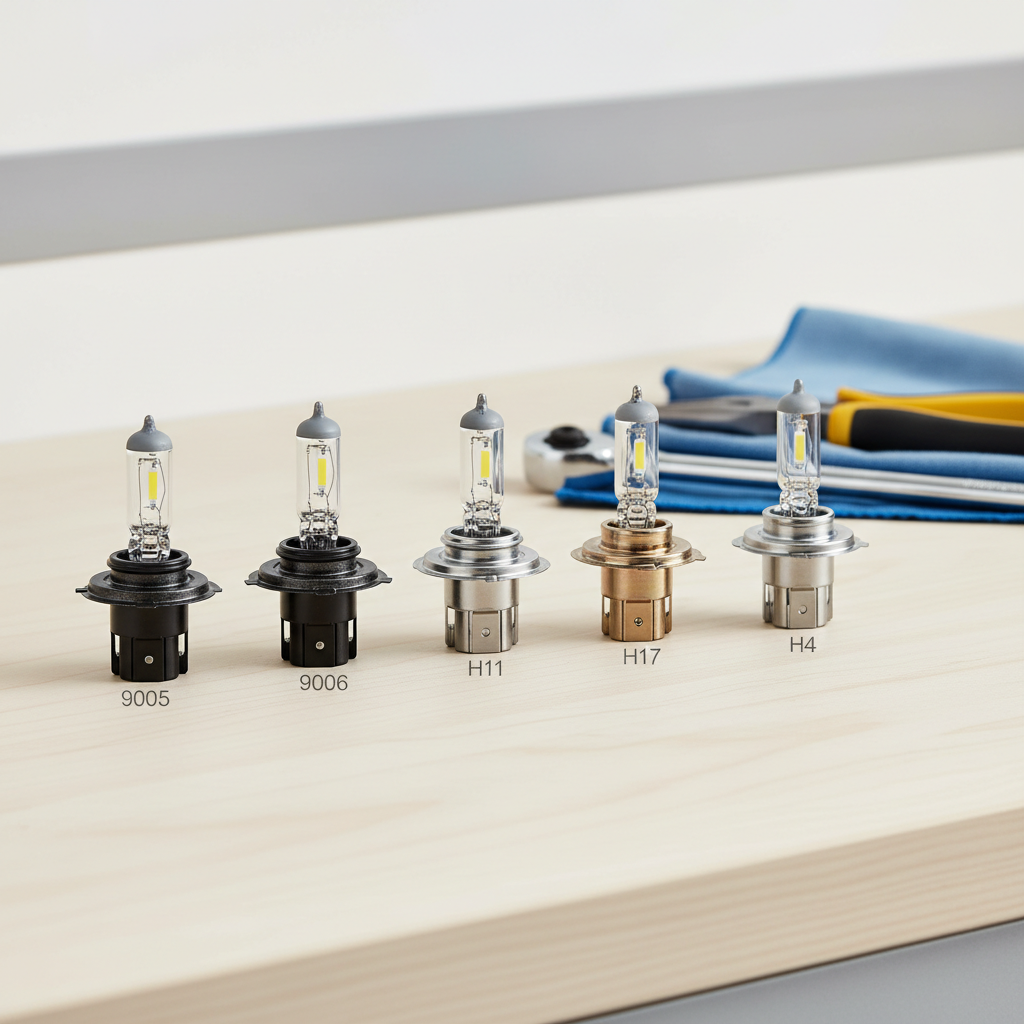
- Single bulb does both (dual-filament or dual-mode): Common with halogen types like 9003/H4 in some vehicles, but many U.S. cars use separate 9005 (high) and 9006 (low).
- Separate bulbs: If only one beam is out, you may replace just that bulb, unless the other side is also old and dim.
- LED/HID systems: Some are “bulb-like,” others are integrated modules. If you have factory HID/LED projectors, replacement may be more involved than a simple bulb swap.
Key point: If you’re not 100% sure which setup you have, check your owner’s manual, the bulb chart under the hood, or a reputable parts catalog by year/make/model/trim.
Before you start: quick checks that can save you an hour
When people search how to replace car headlight bulb high low beam, they often assume it’s always a burned-out bulb. Many times it is, but a few quick checks can prevent unnecessary parts swapping.
- Swap sides (when possible): If the bulb type is the same left and right, move the “bad” bulb to the other side. If the problem follows the bulb, it’s the bulb.
- Check fuses/relays: If both low beams are out at once, a fuse, relay, or switch issue becomes more likely.
- Look for moisture: Condensation inside the lens can shorten bulb life and corrode connectors.
- Inspect the connector: A loose plug, melted plastic, or green corrosion can cause intermittent lighting.
According to NHTSA, working headlights are a core safety item because they affect both your visibility and your ability to be seen, so if you find widespread electrical issues, it may be safer to involve a qualified technician.
Tools and parts you’ll typically need
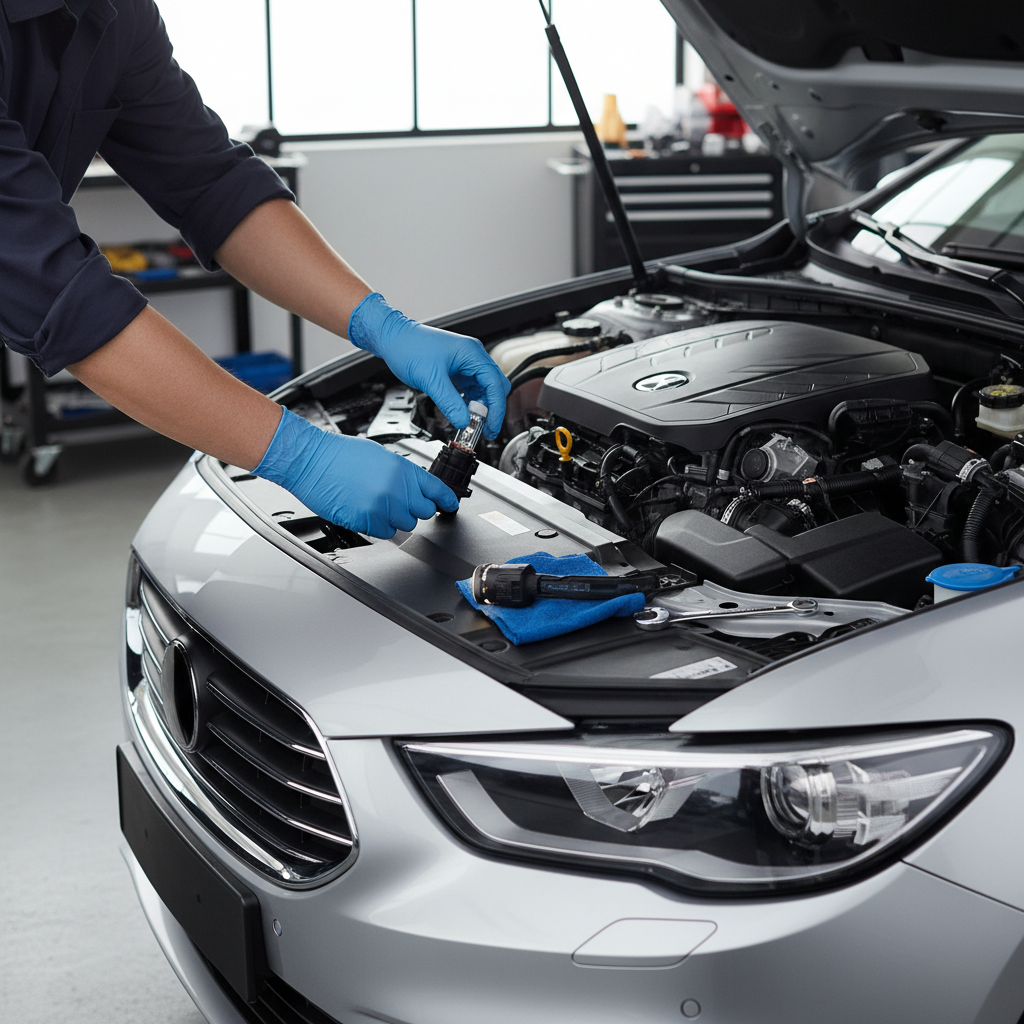
You can often do this with basic tools, but access is the wildcard. Some cars give you plenty of room; others require removing the airbox snorkel, battery cover, or even the front bumper.
- Correct replacement bulb (match type and wattage)
- Nitrile gloves or a clean paper towel (important for halogen)
- Small flathead screwdriver (for clips, depending on design)
- 10mm socket/ratchet (very common for covers and brackets)
- Dielectric grease (optional, for connector weather sealing)
- Flashlight
Halogen note: Don’t touch the glass. Skin oils can create hot spots that shorten bulb life. If you accidentally touch it, clean with isopropyl alcohol and let it dry fully.
Step-by-step: how to replace the headlight bulb (high beam or low beam)
The exact steps vary, but the workflow stays consistent. Take your time, especially on the first side, the second side usually goes faster.
1) Make it safe and accessible
- Park on level ground, set the parking brake, turn lights off, and let the housing cool.
- Open the hood, locate the rear of the headlamp assembly.
- If space is tight, remove only what you need (intake duct, cover panel). Don’t force your hand into sharp edges.
2) Identify the correct bulb position
- High beam is often the inner reflector, but not always.
- Low beam is commonly the projector lens or outer reflector.
- Use the bulb base shape and connector style to confirm you’re working on the intended socket.
3) Unplug the connector and remove the bulb
- Press the connector tab and pull straight back (wiggle gently if it’s snug).
- Remove the dust cap (if equipped).
- Most twist-lock bulbs turn about a quarter turn counterclockwise, then pull out.
- If there’s a spring clip (common on some H7/H4 setups), release it carefully.
4) Install the new bulb correctly
- Align tabs, seat the bulb fully, then twist clockwise to lock.
- Reconnect the plug until it clicks.
- Reinstall the dust cap to keep moisture out.
Small but important: If the bulb isn’t fully seated, the beam pattern can look “scattered,” and you’ll feel like your new bulb didn’t help.
5) Test before reassembling everything
- Turn on low beams, then high beams.
- Check for flicker and verify both sides match in color and brightness.
- If you replaced only one side and the other is noticeably dimmer, consider replacing the pair.
Common bulb types and what they usually mean (quick table)
This table won’t cover every model, but it helps you sanity-check what parts stores often recommend. Always confirm with your manual or fitment tool.
| Bulb type (common) | Usually used for | Notes |
|---|---|---|
| 9005 | High beam | Often separate from low beam; check connector heat and fit |
| 9006 | Low beam | Common on older setups; dim output can signal aged reflectors too |
| H11 | Low beam or fog | Very common; twist-lock base |
| H7 | Low beam (some models) | May use a retaining clip; easy to mis-seat |
| 9003 / H4 | High/low in one bulb | Dual-filament; if one beam fails, the bulb can still partially work |
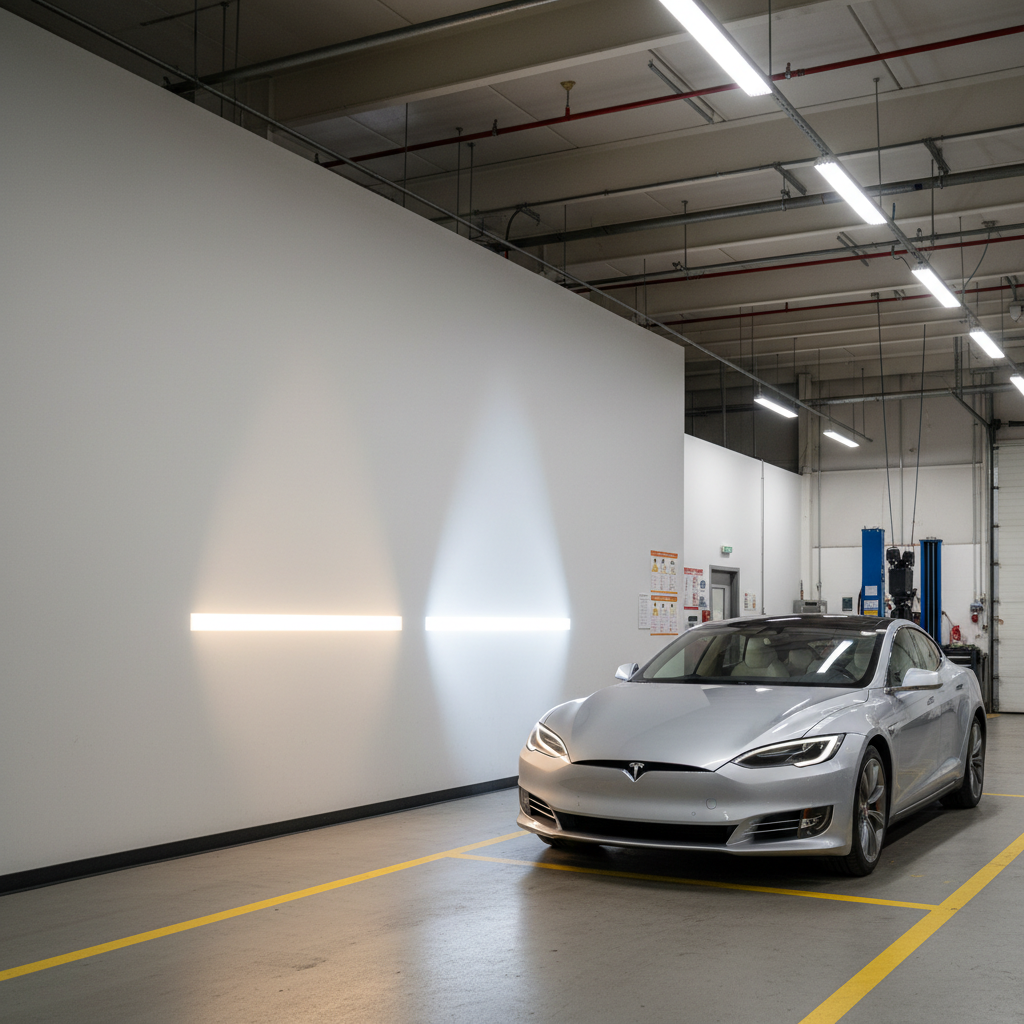
After replacement: aim check and real-world verification
Even if you didn’t touch the housing bolts, a bulb that isn’t seated can change aim. A quick check takes two minutes and prevents glare complaints.
- Park 25 feet from a flat wall on level ground (a typical driveway works).
- Confirm the low-beam cutoff looks even left to right and not pointing high.
- Take a short night drive and verify signs illuminate evenly without blinding oncoming traffic.
According to IIHS, good headlight performance depends on both the lamp condition and correct aim, so if you notice uneven light, it’s worth adjusting or having a shop verify alignment.
Common mistakes and troubleshooting when the new bulb still doesn’t work
Replacing the bulb should solve most failures, but when it doesn’t, the reason is usually simple and frustrating.
- Wrong bulb number: Similar bases can “almost” fit. If it doesn’t seat smoothly, stop and re-check fitment.
- Connector not fully latched: Intermittent lighting often comes from a half-connected plug.
- Blown fuse: Especially if the old bulb failed after flickering or you had water intrusion.
- Melted connector: Heat damage causes poor contact; replacement pigtails are common fixes.
- LED retrofit issues: Some cars need a CANbus decoder or correct polarity, and some housings simply don’t focus LED emitters well.
Troubleshooting shortcut: If only the low beam on one side fails, and a known-good bulb still won’t light, start suspecting the connector or ground, not the bulb.
When to get professional help (it’s not “giving up”)
If access requires removing the bumper, if your vehicle has factory HID/LED modules, or if you find damaged wiring, a shop visit can be the safer call. Electrical shorts can create heat, and headlight housings are expensive to replace if clips crack.
- You see burned pins, melted plastic, or brittle insulation
- Both high and low beams behave oddly across both sides
- Moisture returns quickly after resealing
- You’re dealing with HID ballasts or integrated LED modules
If you’re unsure, consider asking a qualified mechanic or an automotive electrician, especially when troubleshooting goes beyond a basic bulb replacement.
Conclusion: the simplest way to get bright, reliable headlights again
If you follow a clean process, how to replace car headlight bulb high low beam comes down to three things: confirm the right bulb, seat it correctly, then test and check aim before calling it done. If your lights still misbehave after a proper install, don’t keep cycling bulbs, spend five minutes on fuses, connectors, and moisture signs, and bring in help if wiring looks compromised.
Action steps: verify your bulb number in the manual, replace the failing side (or both if color/brightness mismatch bugs you), then do a quick wall aim check tonight instead of discovering glare problems later.
FAQ
- Do high beams and low beams use the same bulb?
Sometimes. Many vehicles use separate bulbs (for example, 9005 for high and 9006 or H11 for low), while others use a single dual-beam bulb. Your owner’s manual is the fastest confirmation. - Why did my low beam go out but high beam still works?
On separate-bulb systems, it often means only the low-beam bulb failed. On dual-beam bulbs, it can mean one filament or mode failed while the other still functions, so replacement still makes sense. - Should I replace both headlight bulbs at the same time?
In many cases, yes, especially with halogen bulbs. They tend to dim with age, so changing both can keep output and color consistent, but it’s not mandatory if the other side is genuinely bright. - Can I touch a halogen bulb with my fingers?
It’s better not to. Oils can shorten lifespan. If it happens, clean the glass with isopropyl alcohol and let it dry before installing. - My new bulb won’t turn on, what should I check first?
Start with the connector seating and the fuse. If it’s an LED retrofit, check polarity and whether your vehicle needs an adapter. If a known-good bulb still won’t light, inspect the socket for heat damage. - Is upgrading to LED bulbs always a good idea?
Not always. Some housings don’t focus LED emitters properly, which can create glare and poor down-road visibility. If you upgrade, choose a reputable kit designed for your housing type and verify beam pattern on a wall. - Do I need to aim headlights after replacing a bulb?
You usually don’t need a full adjustment if you didn’t move the housing, but a quick aim check is smart. A mis-seated bulb can throw off the pattern even when the housing bolts never moved.
If you’re working through tight access, mixed bulb types, or you’d rather avoid trial-and-error, a vehicle-specific bulb fitment check and a quick inspection of connectors and seals can be a more hassle-free path than swapping parts blindly.